plop
plop 介绍
plop 是一种小型生成器,用于按照指令生成定制化的文件。比如在 react 项目中,我们经常会写新的组件,每个组件都会有一些重复性的代码,比如组件的样式文件,路由,依赖的公用库等等。使用 plop 代替人工生成,可以有效提升开发效率,减少出错成本。
如何使用
step1 全局安装依赖
yarn global add plopstep2 写 plop 配置文件
配置文件命名为:plopfile.js,写到你的项目里。
示例
module.exports = (plop) => {
    plop.setGenerator("page", {
        description: "create a page",
        prompts: [
            // 命令行交互
            {
                type: "input",
                name: "module",
                message: "module name",
                default: "MyModule",
            },
            {
                type: "input",
                name: "name",
                message: "page name",
                default: "MyPage",
            },
        ],
        actions: [
            {
                type: "add", // add代表添加文件
                path: "src/pages/{{module}}/{{name}}.tsx", // name为命令行交互中的name
                templateFile: "plop-templates/react-page.hbs",
            },
            {
                type: "append", // append代表追加代码
                path: "src/pages/{{module}}/router.ts",
                template: "import {{name}} from './{{name}}';",
                pattern: /\/\/ \[PLOP_NEW_IMPORTS\]/g, // 加入的代码的匹配到的位置
            },
        ],
    });
};
step3 配置模板文件
plop 主要是用 handlebars 来驱动,命令行中的参数将自动绑定到模板中,如下:
import { FC } from 'react';
import {{name}}Container from 'Containers/Nps/{{name}}';

const {{name}}: FC<{}> = () => {
  return <{{name}}Container />;
};

export default {{name}};
step4 在命令行按照提示输入
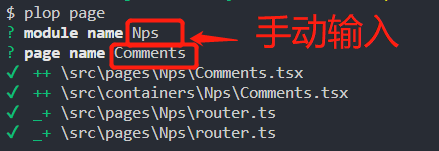
就生成了相关组件,并配置好了路由,如图: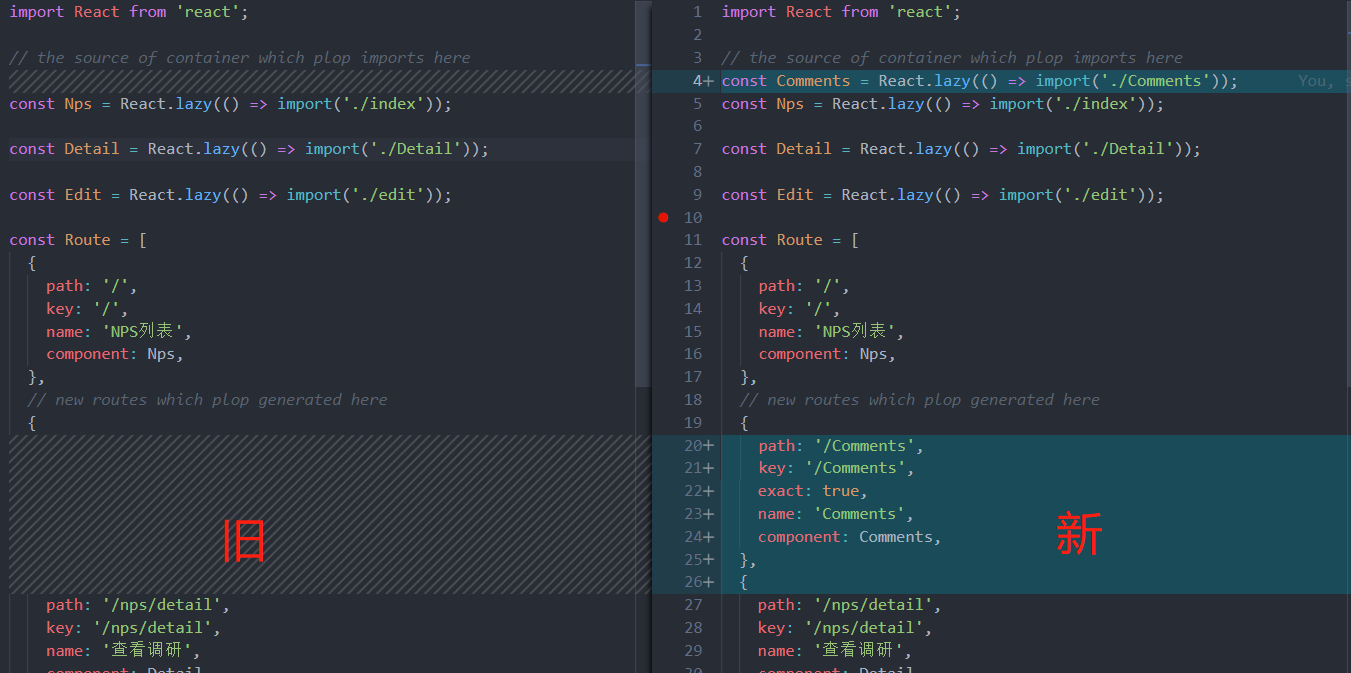
其他
如上图所示,追加的这行代码执行起来没有问题,但只是在 pattern 匹配的语句之后追加,那我们多次执行命令的话,新的引入代码总是在旧的引入代码的前面,就显得不够智能,有强迫症的人士就会很难受。这时,plopfile 就可以修改为:
// plopfile.js
actions: [
    // 追加到routes文件中
    {
        type: "modify",
        path: "src/pages/{{module}}/router.ts",
        pattern: /\/\/ \[PLOP_NEW_IMPORTS\]/g,
        template:
            "const {{name}} = React.lazy(() => import('./{{name}}'));\n// $1",
        transform: (fileContents) =>
            fileContents.replace(/\$1/g, "[PLOP_NEW_IMPORTS]"),
    },
];
如下,追加的新代码就会插入到 pattern 之前,也就是说,新的代码永远会追加到老代码之后。
const Test = React.lazy(() => import("./Test"));
const Test2 = React.lazy(() => import("./Test2"));
// [PLOP_NEW_IMPORTS]其中modify类型是把 pattern 匹配到的字符串修改为 template。而且,modify会提供一个变量组来指代 pattern 匹配到的字符串,比如:$1、$2这种形式,如上例template:"const {{name}} = React.lazy(() => import('./{{name}}'));\n/ $1"这行代码,$1也就是指 pattern 匹配到的字符串,即// [PLOP_NEW_IMPORTS]。
还有,modify中的transform方法,可以在文件写入硬盘之前,再一次修改文件。如上例,拿到$1 变量,对其进行更换,再变成[PLOP_NEW_IMPORTS]占位符,下一次执行 plop 命令就又可以向前插入了。
Helpers
helper 可以对输入的参数进行一些处理,比如我们在输入组件名的时候,可能会有不规范的情况,比如目标组件名为CommentsList,大小写切换比较麻烦,我们就可以使用内建 helper:pascalCase来对输入的参数进行处理,在命令行输入的时候只需键入:comments list就可转换为CommentsList,示例如下:
      {
        type: 'modify',
        path: 'src/pages/{{module}}/router.ts',
        pattern: /\/\/ \[PLOP_NEW_IMPORTS\]/g,
        template:
          "const {{pascalCase name}} = React.lazy(() => import('./{{pascalCase name}}'));\n// $1",
        transform: (fileContents) =>
          fileContents.replace(/\$1/g, '[PLOP_NEW_IMPORTS]'),
}当然也可以自定义 helper:
plop.setHelper("upperCase", function (text) {
    return text.toUpperCase();
});